1、在Quartz2D的图形样式设置中,所有的样式都是针对图形上下文的,只要设置了即会整个图形上下文生成的图形产生影响;
2、具体一点讲,如果设置了线条宽度为2像素,那么后续绘制的所有线条都是2像素宽;
3、如果后续有些线段只需要1个像素宽则重新设置线条宽度,并且该设置会覆盖前面2个像素的设置参数;
4、基于这种特性,对于图形上下文的参数设置Quartz2D引进了一个图形上下文栈的概念;
5、使用非常简单,只需要2步;
5.1、将当前图形上下文设置入栈:CGContextSaveGState(CGContextRef c);
5.2、将保存的图形上下文恢复到当前的上下文设置中:CGContextRestoreGState(CGContextRef c);
6、入栈与出栈操作一般成对出现,并且可以嵌套;
7、示例说明:
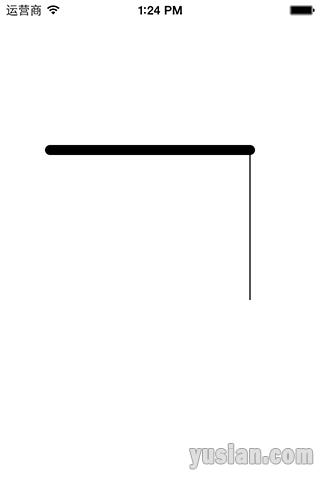
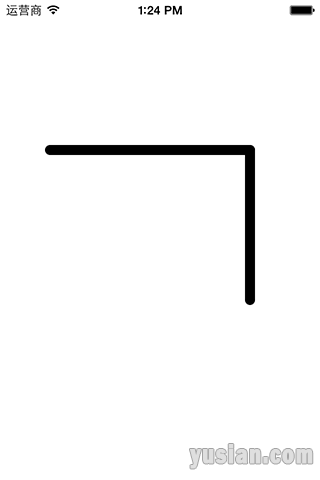
7.1、函数graphOne()为未使用图形上下文栈的效果,graphTwo()为使用了图形上下文栈的效果
1 2 3 4 5 6 7 8 9 10 11 12 13 14 15 16 17 18 19 20 21 22 23 24 25 26 27 28 29 30 31 32 33 34 35 36 37 38 39 40 41 42 43 44 45 46 47 48 49 50 51 52 53 54 55 56 57 58 59 60 61 62 63 64 65 66 67 68 69 70 71 | // // SAView.m // Quartz2D // // Created by 余西安 on 14/12/1. // Copyright (c) 2014年 Sian. All rights reserved. // #import "SAView.h" @implementation SAView -(void)drawRect:(CGRect)rect { graphTwo(); } void graphOne() { // 1、获取上下文(开启当前绘图板) CGContextRef c = UIGraphicsGetCurrentContext(); // 绘制第一条线段 // 2.1、设置线宽为10像素、线端为圆角 CGContextSetLineWidth(c, 10.0); CGContextSetLineCap(c, kCGLineCapRound); // 2.2、描述一条线段从点(50, 150)到(250, 150); CGContextMoveToPoint(c, 50, 150); CGContextAddLineToPoint(c, 250, 150); // 2.3、渲染当前线段到图层 CGContextStrokePath(c); // 绘制第二条线段 // 3.1、描述一条线段从点(250, 150)到(250, 300) CGContextMoveToPoint(c, 250, 150); CGContextAddLineToPoint(c, 250, 300); // 3.2渲染当前线段到图层 CGContextStrokePath(c); } void graphTwo() { // 1、获取上下文(开启当前绘图板) CGContextRef c = UIGraphicsGetCurrentContext(); CGContextSaveGState(c); // 2.1、设置线宽为10像素、线端为圆角 CGContextSetLineWidth(c, 10.0); CGContextSetLineCap(c, kCGLineCapRound); // 2.2、描述一条线段从点(50, 150)到(250, 150); CGContextMoveToPoint(c, 50, 150); CGContextAddLineToPoint(c, 250, 150); // 3、渲染当前线段到图层 CGContextStrokePath(c); // 还原之前的上下文 CGContextRestoreGState(c); // 描述一条线段从点(250, 150)到(250, 300) CGContextMoveToPoint(c, 250, 150); CGContextAddLineToPoint(c, 250, 300); // 渲染当前线段到图层 CGContextStrokePath(c); } @end |
7.2、运行效果图:(左为graphOne()的结果,右为graphTow()的结果)

